목차
1. AWS S3 생성
1-1 버킷 생성

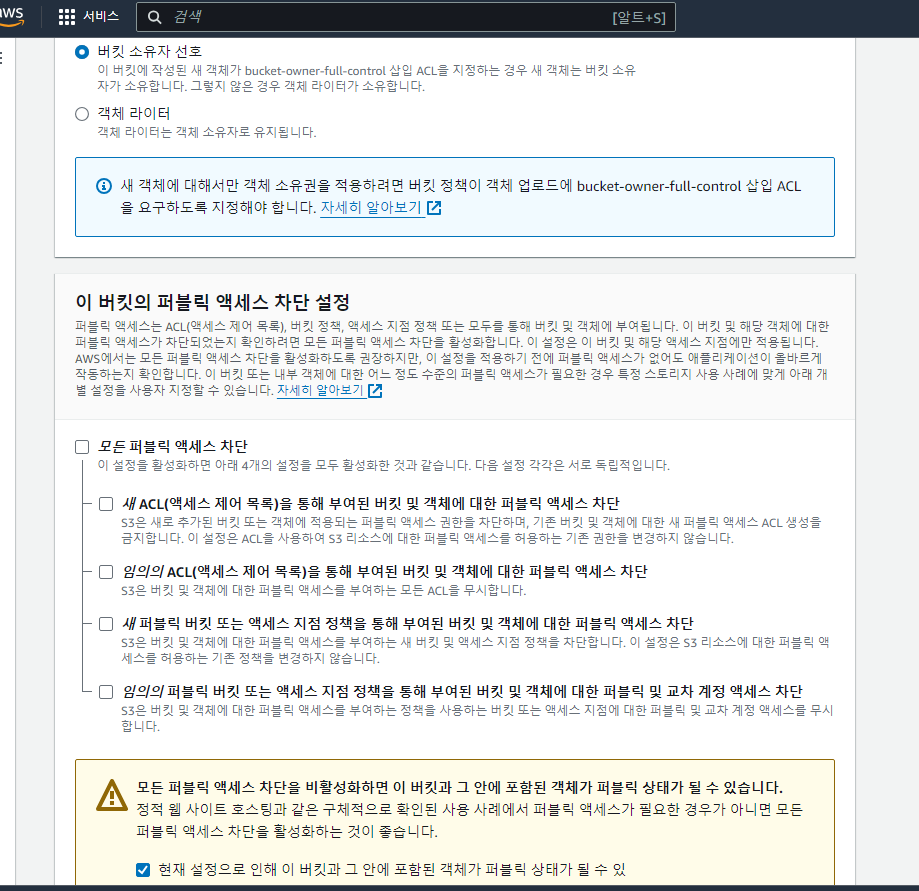
AWS 사이트에 들어가 로그인을 해준 후 S3탭에 들어가서 [버킷 만들기] 버튼을 누른다. 설정은 위의 설정만 똑같이 해주고 다른 설정은 건들 필요 없이 [버킷 만들기] 버튼을 눌러준다.
1-2 버킷 생성 확인

위와 같이 버킷이 생성이 되었다면 [다음]으로 넘어간다.
2. IAM 설정
2-1 사용자 생성

IAM을 검색해서 들어간후 [사용자 생성] 버튼을 누른다.

사용할 이름만 작성 후 [다음]으로 넘어간다.
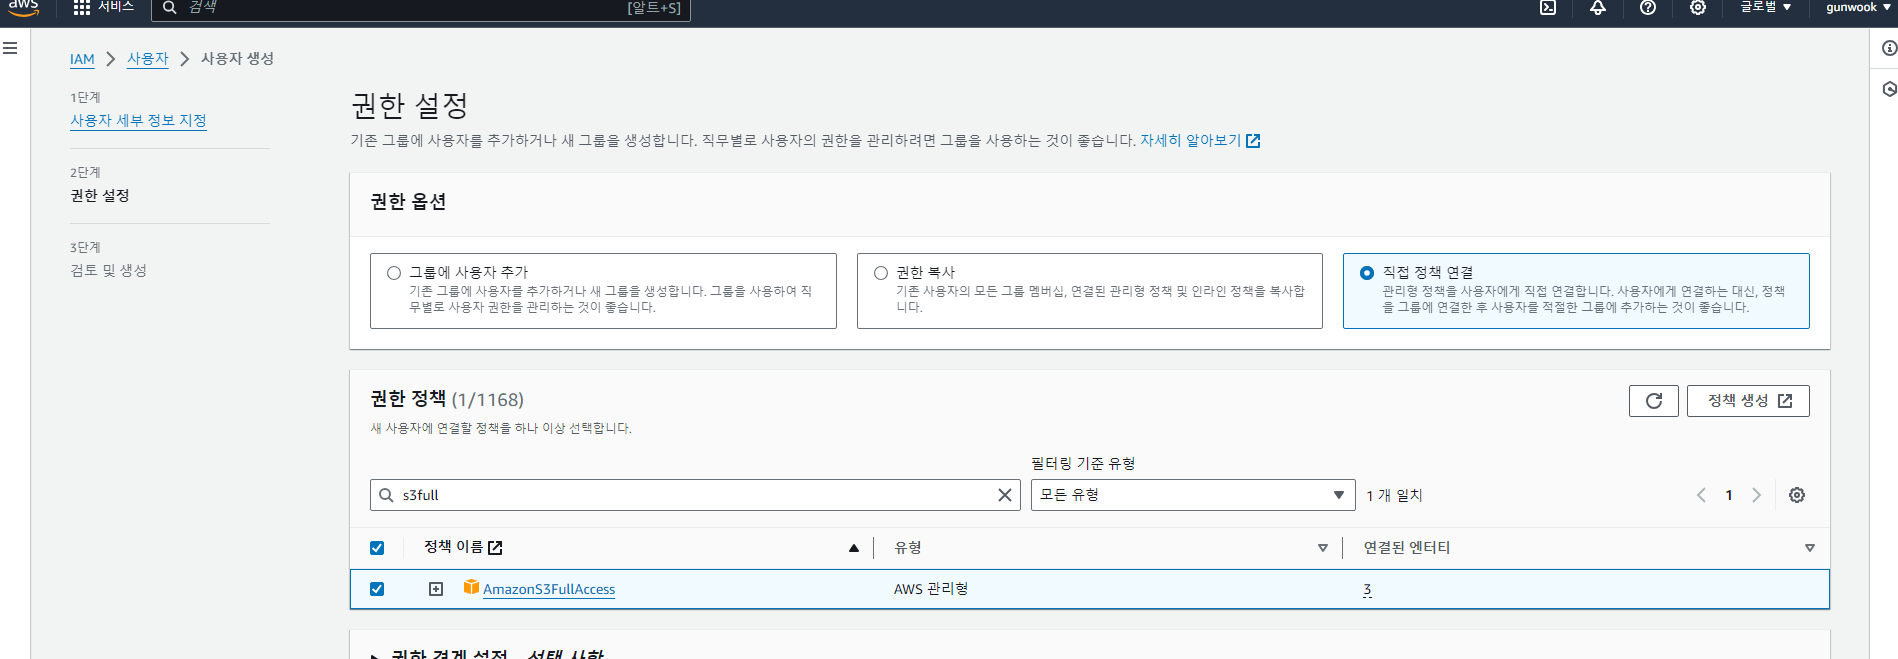
다음 버튼을 누르면 이 화면이 뜬다. 세 번째 직접 정책 연결 버튼을 누른 뒤, 검색 창에 s3 full을 쳐서 AmazonS3 FullAccess 버튼을 체크 후 [다음]으로 넘어간다.

[사용자 생성]을 눌러 주면 된다.
2-2 액세스키, 시크릿키 저장
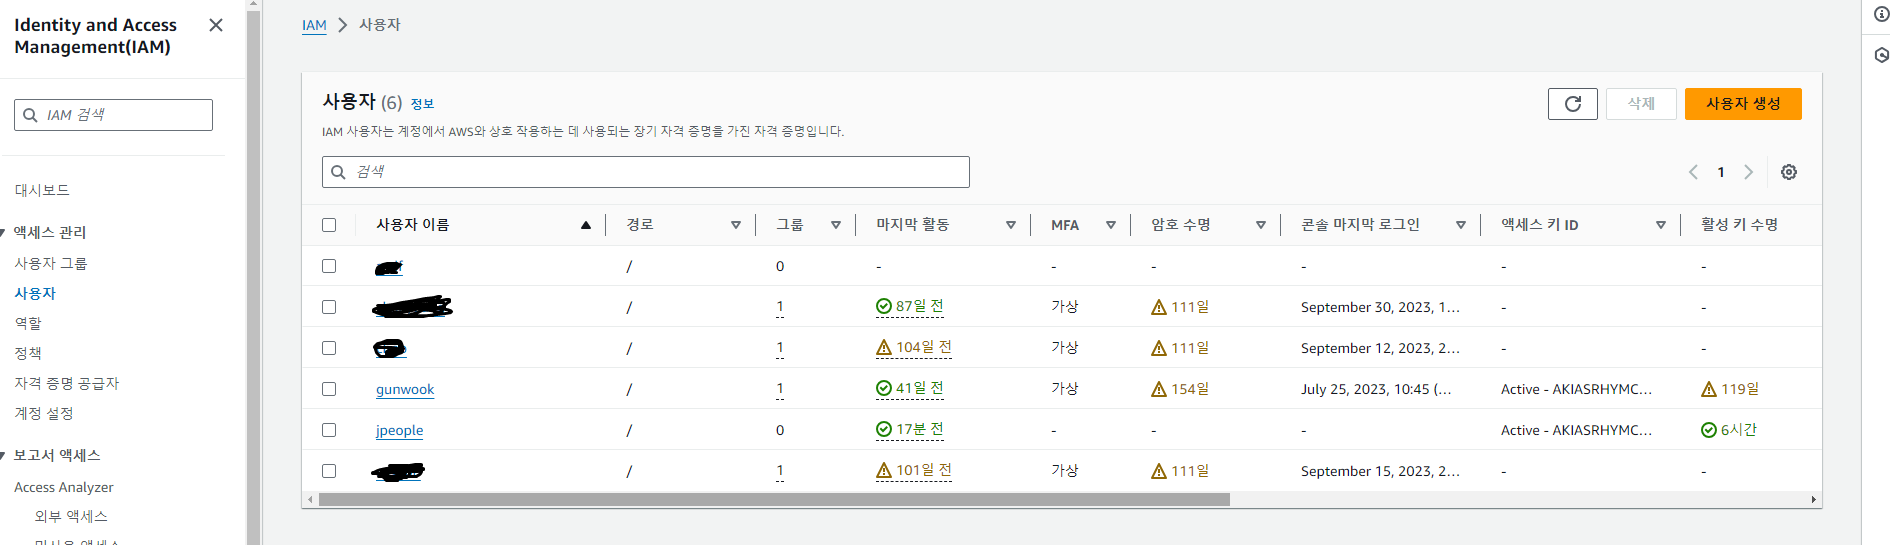
2-1을 잘 따라 했다면 다음과 같이 사용자가 생성된다. 파란색으로 된 사용자 이름을 클릭해 준다.
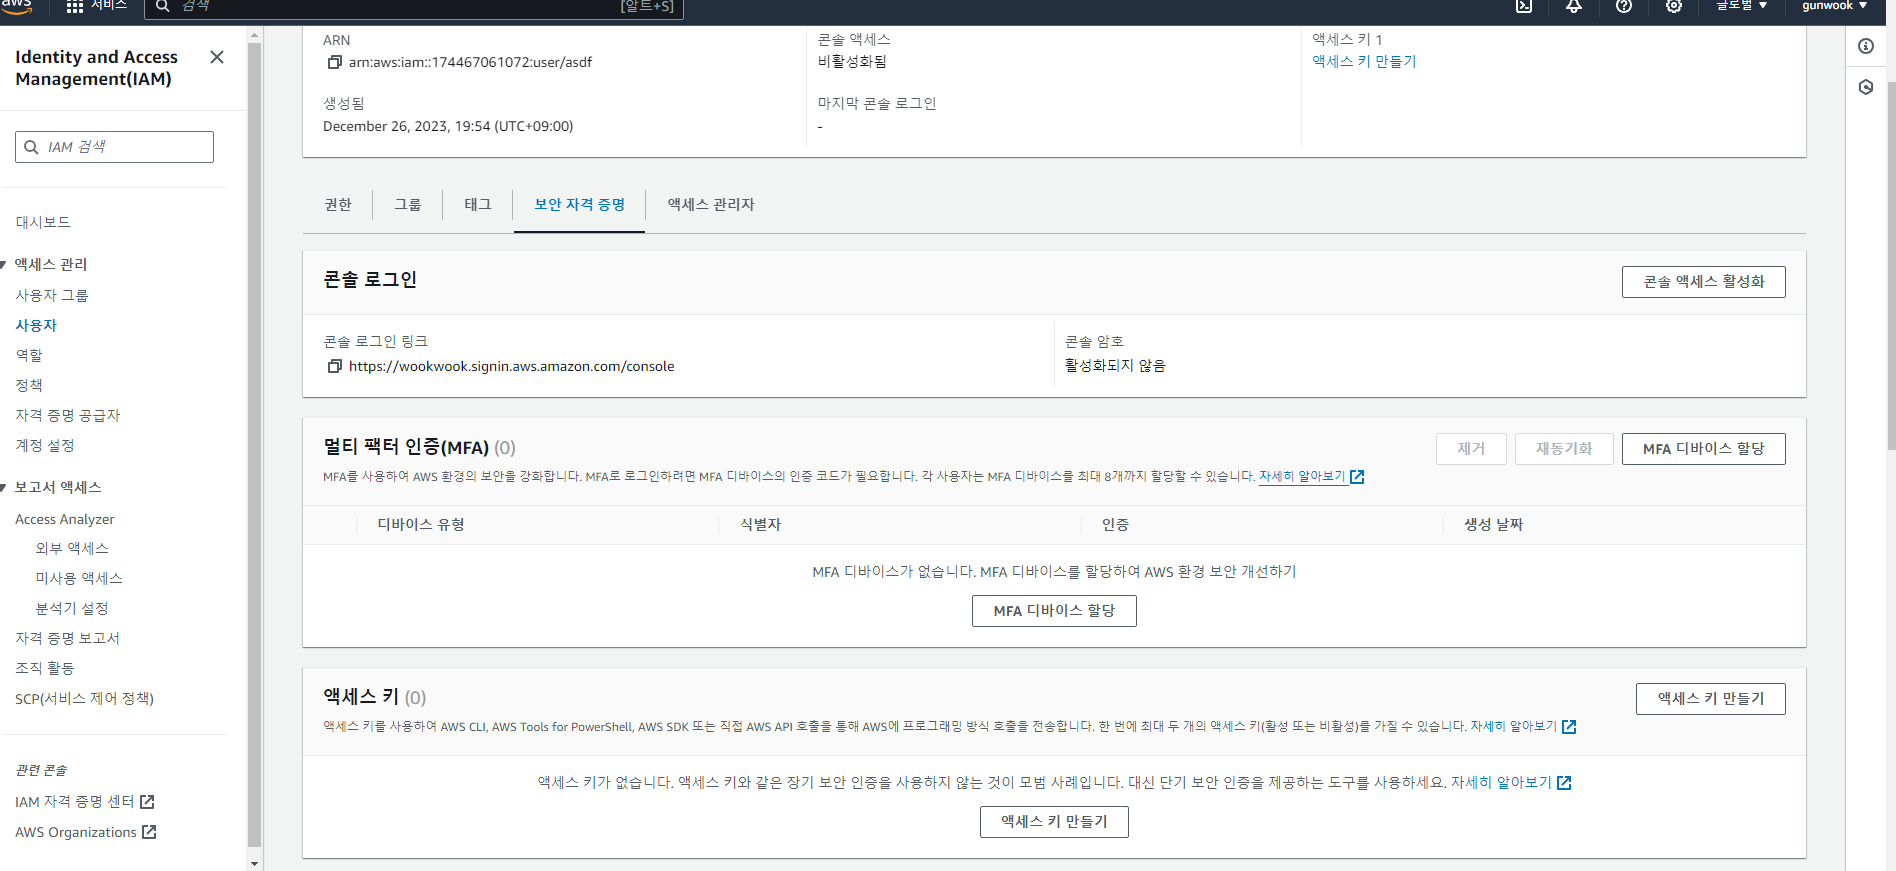
클릭을 해주고 보안 자격 증명 탭에 들어가면 [액세스 키 만들기] 버튼이 보인다. 클릭해 준다.

위와 같이 체크해 주고 다음 버튼을 누른다.

태그 설정 후 [액세스 키 만들기] 버튼을 클릭해 준다.

만들어졌다면 액세스키, 비밀 액세스키를 따로 저장해 두고 csv 파일을 다운로드해둔다.
3. 프로젝트에 적용하기
3-1 의존성 추가
    //aws s3
    implementation 'org.springframework.cloud:spring-cloud-starter-aws:2.2.6.RELEASE'
build.gradle에 위의 의존성을 추가해 준다.
3-2 application/properties 추가
cloud.aws.credentials.accessKey= //발급받은 엑세스키
cloud.aws.credentials.secretKey= //발급받은 시크릿키
cloud.aws.s3.bucket= //버킷이름
cloud.aws.region.static=ap-northeast-2
cloud.aws.stack.auto-=false
yml 파일 또는 properties에 다음과 같은 설정을 작성해 준다. (aws 키값은 노출이 되면 곤란해질 수 있으니 주의하고 yml, properties 파일은 /gitignore에 넣어서 git에 업로드 되게 하지 않는다.)
3-3 config 추가
@Configuration
public class S3config {
    @Value("${cloud.aws.credentials.accessKey}")
    private String accessKey;

    @Value("${cloud.aws.credentials.secretKey}")
    private String secretKey;

    @Value("${cloud.aws.region.static}")
    private String region;

    @Bean
    public AmazonS3 amazonS3Client(){
        AWSCredentials credentials = new BasicAWSCredentials(accessKey, secretKey);

        return AmazonS3ClientBuilder
                .standard()
                .withCredentials(new AWSStaticCredentialsProvider(credentials))
                .withRegion(region)
                .build();
    }
}
다음과 같이 config 파일을 추가해 준다. AmazonS3 객체를 만들어 주입해 주는 과정이다.
3-4 S3 Uploader 추가
@RequiredArgsConstructor
@Service
@Component
@Slf4j
public class S3Uploader {
    private final AmazonS3 amazonS3;

    @Value("${cloud.aws.s3.bucket}")
    private String bucket;

    public String upload(MultipartFile multipartFile, String dirName) throws IOException {
        File uploadFile = convert(multipartFile)
                .orElseThrow(() -> new IllegalArgumentException("MultipartFile -> File 전환 실패"));
        return uploadFile(uploadFile, dirName);
    }

    private String uploadFile(File uploadFile, String dirName) {
        String fileName = dirName + "/" + UUID.randomUUID() + uploadFile.getName();
        String uploadImageUrl = putS3(uploadFile, fileName);

        removeNewFile(uploadFile);  // 로컬에 생성된 File 삭제 (MultipartFile -> File 전환 하며 로컬에 파일 생성됨)

        return uploadImageUrl;      // 업로드된 파일의 S3 URL 주소 반환
    }

    private String putS3(File uploadFile, String fileName) {
        amazonS3.putObject(
                new PutObjectRequest(bucket, fileName, uploadFile)
                        .withCannedAcl(CannedAccessControlList.PublicRead)    // PublicRead 권한으로 업로드 됨
        );
        return amazonS3.getUrl(bucket, fileName).toString();
    }

    private void removeNewFile(File targetFile) {
        if (targetFile.delete()) {
            log.info("파일 삭제가 완료되었습니다.");
        } else {
            log.info("파일 삭제가 실패되었습니다.");
        }
    }

    private Optional<File> convert(MultipartFile files) throws IOException {
        // stack-over-flow code
        File convertFile = new File(System.getProperty("java.io.tmpdir") +
                System.getProperty("file.separator" ) +
                files.getOriginalFilename());

        if (convertFile.createNewFile()) {
            try (FileOutputStream fos = new FileOutputStream(convertFile)) {
                fos.write(files.getBytes());
            }
            return Optional.of(convertFile);
        }
        return Optional.empty();
    }

    //file 삭제

    public void fileDelete(String s3Key) {
        try {
            amazonS3.deleteObject(this.bucket, s3Key);
        } catch (AmazonServiceException e) {
            System.out.println(e.getErrorMessage());
        }
    }
파일을 받아 서버로 업로드하는 코드이다.
각 메서드 역할
1. upload: MultipartFile을 받아서 파일을 로컬 시스템에 저장한 후, 해당 파일을 Amazon S3로 업로드. 업로드된 파일의 URL을 반환.
2. uploadFile: 업로드할 파일과 파일 이름을 받아서 S3에 업로드하고, 업로드된 파일의 URL을 반환.
3. putS3: 실제로 파일을 S3에 업로드. PutObjectRequest를 생성하여 Amazon S3에 파일을 업로드하고, 업로드된 파일의 URL을 반환.
4. removeNewFile: 로컬에 생성된 파일을 삭제. S3에 업로드한 후에는 더 이상 로컬에 저장된 파일이 필요하지 않으므로 해당 파일을 삭제하는 역할.
5. convert: MultipartFile을 File로 변환. MultipartFile을 로컬 시스템의 임시 디렉터리에 저장하고, 이를 File 객체로 변환하여 반환.
6. fileDelete: S3에서 파일을 삭제. S3에서 지정된 키(s3 Key)에 해당하는 파일을 삭제하는 역할.
4. 용도에 따라 적용시키기 (게시글에 이미지 추가 / 프로필 사진 추가) - 프로필 사진 추가법
4-1 profile_url 칼럼 추가
    @Column(name = "profile_url")
    private String profileUrl = "/images/logo.png";
나는 웹사이트의 로고 이미지를 기본 프로필로 사용하기 위해 User Entity에 다음과 같은 칼럼을 생성해 줬다.
4-2 컨트롤러 작성(업로드, 파일삭제)
   /**
     * 프로필 사진 업로드(변경)
     * @param file 이미지 파일
     * @param userDetails 로그인 정보
     * @return 결과 반환
     * @throws IOException
     */
    @PostMapping("/mypage/profile/upload")
    public ResponseEntity<String> uploadProfileImage(@RequestParam("profileimage")MultipartFile file,
                                                     @AuthenticationPrincipal UserDetailsImpl userDetails) throws IOException {
        String result = myPageService.uploadProfileImage(file, userDetails.getUser());
        return ResponseEntity.ok(result);
    }


    /**
     * 프로필 사진 제거(기본 이미지로 변경)
     * @param userDetails 로그인 정보
     * @return 결과 반환
     */
    @DeleteMapping("/mypage/profile/delete")
    public ResponseEntity<String> deleteProfileImage(@AuthenticationPrincipal UserDetailsImpl userDetails){
        String result = myPageService.deleteProfileImage(userDetails.getUser());
        return ResponseEntity.ok(result);
    }
우선 두 개의 메서드만 작성해서 사용했다. 프로필 사진을 업로드하는 것과 제거하는 것 두 개를 만들었다.
프로필 변경을 할 때는 이미지 파일, 로그인 정보 두가지를 받도록 했고, 사진 제거를 할때는 로그인된 유저 정보만 받아왔다.
4-3 서비스 코드 작성
   @Transactional
    public String uploadProfileImage(MultipartFile file, User user) throws IOException {
        User requestUser = userRepository.findById(user.getId()).orElseThrow(
                () -> new IllegalArgumentException("로그인 후 사용하세요.")
        );

        String ProfileUrl = s3Uploader.upload(file, "profile");
        requestUser.setProfileUrl(ProfileUrl);

        return "프로필 사진 업로드에 성공하였습니다.";
    }


    @Transactional
    public String deleteProfileImage(User user) {
        User requestUser = userRepository.findById(user.getId()).orElseThrow(
                () -> new IllegalArgumentException("로그인 후 사용하세요.")
        );

        String s3Url = user.getProfileUrl();
        String s3Key = s3Url.substring(s3Url.indexOf("profile/"));

        s3Uploader.fileDelete(s3Key);
        requestUser.setProfileUrl("/images/logo.png");

        return "프로필 사진 제거에 성공했습니다.";
    }
uploadProfileImage - 로그인 정보를 받아와 User 객체를 만들어주고 넘겨받은 파일을 s3에 업로드 해준 뒤 setProfileUrl을 사용해서 반환받은 사진 Url을 설정해 줬다.
deleteProfileImage - 로그인 정보를 받아와 User 객체를 만들어주고 저장되어 있는 프로필 url을 가지고 온다. 그 뒤 key값 형태에 맞추기 위해 s3 Url을 profile/부터 잘라서 저장했다. 그 뒤 fileDelete를 사용해 객체를 제거하고 프로필 사진을 기본 로고로 바꿔줬다.
4-4 테스트

기본 이미지 사진.
간단한 테스트를 위해 먼저 프런트 부분에서 사진을 띄워서 사용했다.

포스트맨을 사용해서 테스트했다.

변경 후 바뀐 이미지 사진.
'공부메모 & 오류해결 > Spring Boot' 카테고리의 다른 글
| [ElasticSearch] Elasticsearch란 뭘까? (0) | 2024.01.23 |
|---|---|
| [Spring Boot + OpenWeather] OpenWeather를 사용해서 날씨정보 가져오기 + Spring Boot (0) | 2023.12.30 |
| [SSE] 알림기능에 SSE (Sever-Sent Events)를 사용한 이유? (0) | 2023.12.21 |
| [Spring Boot + Redis] Spring Boot에서 리프레시 토큰 사용하기(Redis) (1) | 2023.10.17 |
| [Spring Boot + OAUTH2.0] Spring Boot 소셜로그인(네이버) 구현법(Oauth2.0) (0) | 2023.10.10 |

남건욱's 공부기록